This year I picked a new fall for my hair, and I made a new hat to go with the gown. The hat is not quite what I wanted but it worked well. I had not intended to make the hat until the fall of 2017, but a friend offered to do a Christmas photo shoot so that we had updated shots for the DH's Santa visits and I had good shots of my gown.
I had seen the fall at Celtic Christmas at the Texas Renaissance Festival in 2015. At the time I couldn't afford to purchase it but I liked it. This year when we visited I picked it up. The only issue we found with it was that it was slightly darker than my natural hair. I looked great with it and loved it but I got a couple comments that the slight difference was just enough to say "fake" to them. That isn't a bad thing, but I wanted it at least in the ballpark of 'natural'. That left me with two options. A) I take the fall to a beautician who knew what they were doing and had them color the fall so it matched my hair. That would have been very expensive. OR B) I make a hat or hair ornament to bridge the gap so that the difference wasn't obvious. I went with option B.
I had a late victorian era hat/hair ornament pattern made by Butterick. I used it as guidance but only used the pattern piece to make the hat base shape correctly. Historically you would use buckram, I tend to use plastic canvas when I make hats that we need to take abuse. This recommendation came from the head of the millinery department of the National Ballet of New Zealand. I think his recommendations on hat structure are sound. I covered the base with the same red cotton as my dress. I hand tacked with thread a holy floral arrangement along the front. As it was the holiday season there were clearance floral decorating items everywhere. I had intended to put a poofy red bow in the back instead I looked at the dress and tried to make the hat seem like an extension of the dress. I added a white frill in the back, and white and gold cord for decoration, and then a ribbon drape down the back. All of the decorative items I had in my stash as small scraps left over from other projects. I still feel I need more but not sure what.
I hope to add more upgrades to Mrs. Claus this year namely a new corset (be it made by me or my friend CC) and new ball gown bodice. If I have time I might even have time to make a new chamiselet to go with it as well. Let's see what this new year holds.
Wednesday, January 4, 2017
Tuesday, January 3, 2017
1940's Pin up Wonder Woman, but with a twist
A 1940's pin up Wonder Woman is already a twist on the classic Linda Carter out fit but add in that my 4 year old wanted to wear the design for Halloween takes it to whole other level!
Simplicy recentlly did a line of DC Bombshell cosplay patterns. I had a possible client who fell in love with the wonderwoman design and wanted it for Halloween, however her funds were not in place when her sewing slot came up, therefore that didn't happen. In the mean time, my 4 year old saw the design and imediatly fell in love with wonderwoman and wanted that design. Let the head ache's begin....
I started with the original pattern design and broke it down into what I would need to make 'kid friendly'. The original top is a short bowling shirt style top, but the center front is an invisible zipper with the WW logo over the top. I found a kids bowling shirt pattern and put the invisible zipper in the front so the logo lined up properly. While the zipper on the adult might be to show cleavage, the kiddo version was for functional purposes. The next part was the shorts. The adult version was a pair of sailor shorts with white stars one the front. That wasn't a problem to do a kids elastic waist shorts were not a problem to find in my stash. With the basic forms located I went on to the details.
In order for the pieces to be to the right scale I shrunk the decorative stars, boot covers, gauntlets, and tiara with a copy machine. This worked fine except in the boots, I forgot the seam allowances on them also shrunk. If I do that again, I will need to add seam allowances to the design. It just meant that at the 11th hour I had to add Velcro to the back seam of my daughter's boots. While a pain, it isn't uncommon when it comes to cosplay designs, ask anyone about their hail Mary's right before a con/event.
What was really cool about this design was that it was also a joint effort with my husband. He does amazing prop stuff, but we haven't had a chance to team up on a project together. He did the gauntlets out of glitter craft foam, and heavy duty sticky back velcro. The crown is simular, however I made a matching fabric headband that he attached to the crown. I added an elastic snap 'holster' to hold the golden lasso he made for her. All in all it turned out great. I had a couple people trying to buy it off her back! One of my favorite memories is seeing her sashaying down the day care hallway to music from the Linder Carter wonder woman theme song.
I am quite amazed at how well it turned out for 'not having a pattern', and that all but the craft foam and the zipper came out of my stash. I had red satin, blue and white cotton fabric. I had picked up years before reflective fabric bias tape out of clearance bin at Joanns. I used that as part of the logo on her chest, and I used it as the decorative bias on the boot cuts, and bottom edge. I ran out of time otherwise I would have put it on the cuffs of her shirt. I made her not only an amazing outfit, but it was a safe one too. I call it an over all win for the hubby and I both.
The only thing is, how are we going to top it the next year?
What should we do with all this left over wool?
We chose Butterick Pattern 6339 , Men's historical single and double breasted vests. We did view C, double breasted with lapel. The one alternation to the basic pattern I did, was make the two lower welts actual welted pockets. Any seamstress will admit that welted pockets are a pain the backside but they do look nice. The client and my husband both wanted the ability to have a pocket watch with chain.
The client still had some of his silk satin left, and we used that for his lining and back of the vest. For my husband I used a polyester lining. Again I did my markings with tailor tacks. I did use chalk for the darts. My husband's required an additional alteration to accommodate his 'bay window.' The only draw back to doing this for him was that 3 months later his had lost 75% of the bay window so the vest now hangs funny. While I am very proud of him for loosing the weight and getting healthy, my inner seamstress is cursing him profusely for messing up my work. Oh well I'll have to make him a new one later.
Notes about the construction were that because of the alterations I had to make for my husband the lines changed slightly for the welted pockets. Anyone making this with similar alteration would need to take that into account. If someone is wanting to get into tailoring I would consider the pattern I used a great way to try it out. The pattern has you do lapels, and welted pockets, both of which are used in larger tailoring projects. A reminder I will throw out when doing these adjustments for double breasted items. Make sure the swing is added at the CF line, NOT the overlap edge. You want the additional space at the CF, not elsewhere which throws off your line.
The one change I think I will make going forward is that I would cut the back out of the main fabric instead of the lining, as the pattern suggests. That is because here in the southern United States many men don't wear a jacket except when the temperature drops below 40 degrees, which isn't often. It isn't uncommon for a well dressed gentleman to wear a nice shirt, trousers (or kilt), tie, and a sharp vest. Any more and they would melt! By doing the back in the main fabric it gives it a bit more of a faux-suit feel, otherwise it looks like the guy forgot his suit jacket.
I do not have photograph of my client but I do have my husband wearing it out to a special event. The only visual difference between his and the clients is that my husband us shiny silver buttons, and the client had buffalo nickle buttons. Otherwise a couple nice vests for two sharp gentlemen.
An update on the Bonnie Prince Charles
I was commissioned in the Spring of 2016 to create a Bonnie Prince Charles jacket for a client. Other than dealing with I wish I had taken a millimeter more off to make something lay flatter or stitched something 3 stitches shorter. (I know nit picky but all sewer's are like that.) I think it turned out well.
Jacket with out lining. |
The lapels required that you steam them, and no I do not mean pressing them flat. You use a steam iron to shock the wool, then using rolled up towels shape the fabric so it lays properly. You will need to leave then to dry at least over night. One of the cringe worthy things I saw was a prince Charles that someone had pressed the lapels and collar so flat they were like cardboard and had no drape what so ever. Makes me shutter now.
Main coat with lining added. |
The lining is a silk satin which didn't fray as much as I thought it would. The lapel is silk taffata. The buttons are diamond shape pewter thistle buttons. I used tailor tacks to mark the button positions. Due to the wool , normal marking procedures do not work as well. Yes tailor tacks are old school, however when the old ways actually work, why not use them.
The final product turned out rather well, and like I said I had my nit picking things, but the client loved it. One quibble I have is that the buttons I got were a longer shank that expected. This caused them to lay over when sewn onto the coat. Either I need a different technique or just a different button supplier. I am not sure.
Close up of the back pleat buttons |
1870's Pumpkin Pie
As part of the challenge we are encouraged to have a blog post about our project.
Name: 1870's pumpkin Pie
The Challenge: Procrastination
Material: Orange Wool
Pattern:
Year:
Notions:
How historically accurate is it?
Hours to complete:
First worn:
Total cost: $15 for the wool
Somewhere someone told me it is always good to name your projects so you know what you are talking about with others. It also allows you to reference back when doing other projects. I decided to call this my Pumpkin Pie dress because it reminds me of 1) that we got the fabric at the disabled veterans thrift store Black Friday sale and 2) because the orange and white combination reminds me of pumpkin pie and whipped cream.
Honestly the hard part was deciding which pattern I was going to use. I had barely 7.5 yards of fabric, and to pull off anything nice with this outfit I would have to find a way to make that fabric stretch. I originally wanted to do the same bodice I did for my Mrs. Claus project, but after getting an amazon gift card I picked up the Polinase pattern from Truly Victorian. It is considered one of the most challenging patterns, but also one of the more rewarding patterns. The skirt originally was going to be a fan tail but the event that I would be going to is not very conducive to a train, I decided to go with the basic skirt pattern I used for my underskirt on my Mrs. Claus project. Nothing wrong with that because that is what it is made for. All the flare will go to the bodice, not the skirt in this project.
In October of 2016 I got out the wool and cut out and assembled the skirt portion. The assembly actually wasn't that difficult. My only difficulties came when I realized I had done the seam placket in the right front side seam, not the side BACK seam. I had already gotten the waist band on by the time I realized it. Thankfully it only took an hour to resew the seam, and get the waist band back on. I shortened the skirt three inches, and I also took note of how much the green Mrs. Claus dress touched the ground. This sent me back to update/ rebuild my bustle, and add a pad to it. (See Bustle Rebuild) While the skirt isn't terribly heavy the bustle needed to have a solid structure in order to properly support the skirt it's self.
As I have pretty much everything I need to get started on this, except for time. I hope to have the bodice portion done for TRF this year. Wish me luck, and I will keep you posted.
The Sexy stepford wives outfits, with a Jelly donut on top
Pattern image from McCalls.com site |
I started with McCallas pattern 7398. Recently McCalls has started doing pattern specifically for Co play people to use as bases to make their costumes. This is one of them. I am coming to like the pattern because there are so many possibilities for costumes using this as the base.
My challenge was getting the proper measurements for the actresses. I took the job much later due to drama happening. Normally I would have done the measuring at read through. That did not happen. I was able to get two of the 4 girl's measurements 2.5 weeks before opening, but the last two didn't happen until 10 days before opening! YIKES!! Regardless things did will work out.
The pattern it's self isn't necessarily hard. It is essentially a long corset. The pattern helps you out somewhat because it provides for cup sizes A-D. Anything larger than that would need adjustment accordingly. The big thing is to make a mock up on this project. Just like you wouldn't make a corset with out a mock up, do it on this one.
The pattern is 4 pattern pieces with 4 layers of each piece. You have your main fabric on the outside. That is flat lined with either a twill or canvas to give it more structure. Then the lining is made of cotton, and has medium weight interfacing. What gives the outfit it's structure is the boning. It uses STEEL! A lot of outfits use plastic boning but this one uses proper 1/4" spiral and straight steel. I happen to have some on hand otherwise getting them in time would be tricky.
My greatest problem with this was fitting them to the actresses. This project takes time, patience, mock ups and fittings. I think they turned out OK. I'm just not as happy with them as I would have liked. Due to having to redo each outfit 3-6 times. (Yes I said 6 times!) I was unable to put in the time for decorative details I would have liked. If I got the chance to go back and work more on the project I think I would have more luck. I didn't care for the tutu's they added at the last minute as they didn't match well, and didn't fit with the design. It really needed long gloves, and maybe even the sexy boots thing going on. Then more robot-ish styling to it. Oh well, it hit the stage, no one was hurt, I learned something, and the world still turn. On to the next project!
So much made so little time...
I've been bad posting here about all the projects I have been working on. Be on the look out for about 7-8 posts about various projects I completed last year. Most of them I am proud of doing, some I'm not quite happy with but they are complete.
So far I have a few things on my to make list for 2017.
My husband got me Truly Victorian 416 -1875 Ball Gown Basque for Christmas. My intention is to make a new evening bodice for Mrs. Claus. This will give me a 2nd look for the outfit that is possibly cooler that the original one. If I'm lucky maybe I can also pick up a trained skirt to make a nice under skirt to go with it as well. I need this for TRF's Celtic Christmas. We won the last time we were there, and I would like to win again.
A client has placed an order for a Inverness Coat. We will be using the Reconstructing History Inverness Coat pattern. Right now we are looking a midweight 10-12oz wool or wool blend, lined with either cotton or linen. He needs it by April 1st.
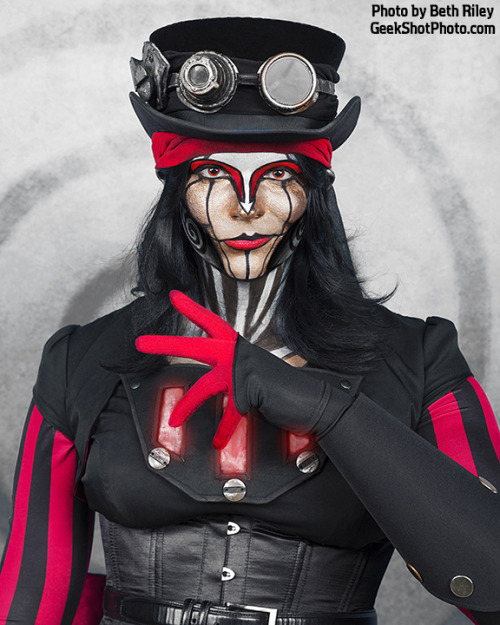
The munchkin has fallen in love with Steam Powered Giraffe. They are a really cool bad out of southern California with a nice Steam punk fan base. She asked me to make her a steam punk outfit based off the character 'Rabbit' from the band. She already has a nice top hat. I want to make her a circle skirt base, with very poofy red petticoat, white tights, and then a long sleeve bodice. It would need a "bib" portion added to get the robot portion added to it. Add some red gloves, and her dad make her some faux goggles, and she is on her way to being steam punk, junior addition.
Other things are a red dress for me for next Christmas, a white 1950's wedding dress for our anniversary, then a green velvet elf dress for the munchkin for next Christmas. I was going to have to make her a belly dancer outfit but after a little bartering she has one one the way. The hubby wanted a Santa's workshop vest for those hot temperature events. The trick on that will be the embroidery we want to do on the vest. I want holly and Christmas stuff, but I also don't want it to be tacky either. Wish me luck.
On top of all that sewing I want to do, I am going back to school to get a second bachelor's degree in Art History. My goal is to be working with , rebuilding, and conserving the rich textile art around us all. For the past 4 years I have been the one at home taking care of things while the hubby finishes his Masters degree in Aesthetic Studies with a focus on Theater for Children. Now it is my turn. I am both terrified, and excited about this new challenge in life. I hope to be able to keep you posted on all my projects. Talk to you soon!
Subscribe to:
Posts (Atom)