I made everything skin outwards. The fit of the gown is determined by what is underneath it. I started with Simplicity 2890 - Women's Drawers, Corset and Chemise- size 12.
I used a 100% Cotton bleached white Muslin for the Drawers and Chemise. The lace was a pre-gathered eyelet that I picked up at Joann's. I had to cut/ un-pick the binding off the eyelet in order for it to work with the bottom hem of the drawers. The buttons were from current stash.

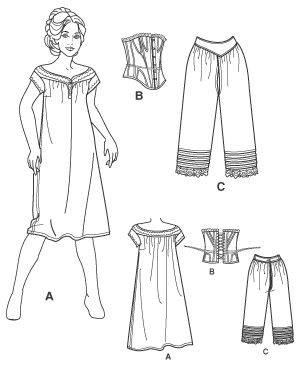 When you make these your brain will tell you that you are sewing them wrong, but you are not. Yes the drawers are open through the crotch area. Typical bloomers are just elasticized PJ bottoms with lace. Those will NOT work with this style of outfit. The corset has you laced snugly from bust to tail bone. With regular bloomers you can NOT get to them under the corset. This causes a serious toilet problem. That is where the drawers come in. The drawers are very full in the back. This prevents drafts, and helps with modesty. The only difficulties I ran into was when "Aunt Flow came to visit" and when the legs of the drawers did not cover the thighs all the way up. With 'Aunt Flow' you can not wear traditional gear under the gown. You will have to make other arrangements. I'll leave that to your imagination and creativity. With the legs not covering the thighs completely I found that I got chafing on hot and sweaty days. My recommendations are baby powder is your friend, look at anti chafing sticks, Or when you are making the drawers adjust the rise on the drawers so they fit your body better to compensate for it.
I know many would not want to discuss it but it is something that must be brought up when wearing one of these gowns... using the toilet. Historically these gowns were worn when you simply stood over a chamber pot and did your business. Now a days, that is not the case. The technique I was told to do was, hike your skirts from the front, spread the drawers and.... sit on the toilet backwards. You will feel like a bloody great idiot the first time you do it, but you will find it will make you life much easier. With so much froo froo, and structure in the back of the gown, trying to control all of it over the toilet bowl is not easily possible. By going backwards, the bulk of the skirts points toward the front of the stall and you only have to control the front of your gown that way. It is odd, but works!
 On top of that I had to find a corset to use. I had originally planned to make myself one, but I ran out of time to be able to make the corset and have the gown ready in time for my event. I got new lacing for an under bust corset I had, but that was a failure. I couldn't get the lines I wanted. I highly recommend getting/ making an over the bust late Victorian corset. Due to my time constraint, I ended up using my Star Trek Next Generation Medical Division steel and Leather corset by A Wench in Gear. Yeah, you read that right. Cee Cee makes these wonderful steel and leather corsets. I have a Sea Queen belted version I wear with my Lady Stitch and my Steampunk inspired outfits. This was a special item the DH got me for my birthday one year. I even wore it to the opening of the new Star Trek movie. It is even the one corset I have no problem wearing all day at work. It is very professional looking. Trust me I love this corset, HOWEVER ... for this application it did the job about 90% of what I needed. If gave me the shape I wanted but the bust line on it is 4 inches too tall. I am hoping to work with Cee Cee to get a basic corset to go under the gown properly. I can't say how much I love Cee Cee's work.

With time and funds short I ended up going with what is called plumbing strapping. You can get it in 5 ft., 10 ft. or 100 foot rolls. You will need a dremel, or heavy duty steel snips to cut it. Then the edges will need to be trim, filed, and then dipped in plasti-dip. This is to prevent it from poking through your casing. Why do I stress this? Because I tried to cut corners and I had the steel break through the fabric and casings have one day of wearing. I had to do repairs, and try wearing it again. The third time, I actually went back and added reinforcement layers of fabric where the steel was pushing up on the muslin. Make sure you put as much time and effort into this item as you would a corset.
If you can afford it, go ahead and get the proper steel boning from Corsetmaking.com . Yes it will be 20 bucks plus another $5-8 for shipping but it will be worth it to get what you need. Just like you don't skimp on your corset, don't skimp on your bustle.
The petticoat is Truly Victorian TV170 - Victorian Petticoats. This was a good investment because this pattern has the proper Petticoat from 1870-1897. I did view 3 (1883-1889) for this dress. Honestly it was the first pattern I had ever made from this company and was incredibly easy. There is one decorative element on it, tucks on the back panel. Are they necessary, no, and they have the line to cut if you don't want them, but it gives you the opportunity to have something a little 'fancy' under your skirts as your own little secret. I used a simple bleached Cotton muslin, with a cotton cording for the waist tie.

I enjoyed working with this pattern because it is very simple but can be done in a variety of ways. You can use it as a simple underskirt with pleating across the back hips, or bustle it with tapes it's self. You can also add a ruffle on the hem for an additional look. I wanted all the attention on my red gown not this, so I chose to keep this basic.
 Unlike my Petticoat, and overskirt, the skirt hooks at the side back seam. Because I did an Imperial Tournure, I added an extra 4-6" onto the back hem, blending it into the side seams. After I had made it, and found the structural problems with the bustle, I most likely didn't need to do that, but it did give me a slight train with the dress, which was nice. The only drawback was the outdoor events tended to be muddy ones. The fix with that was simply to make sure the fabric was washable, and to possibly treat it with scotch guard ( or the like). I also learned that when wearing a train, don't just step backwards, you have to sweep you leg first to move the train. Also, unless your companions are aware you have a train, you may need to remind them not to step on it. :)
In the picture you can see just how much the basic plastic bones fell under the weight of the layers. The finished gown had much more structure that what you see in these images.
Next post I'll tell you about the "fun" I had building the underskirt and bodice.
No comments:
Post a Comment